Start in the Welcome Folder, finish setup, then run a small calculator task with visible proof. Install the app first (see Install Ambient Desktop) and keep the Project Board page nearby for the third task path.
A first session runs in that order: the product-owned Welcome Folder, then setup, then one small implementation task.
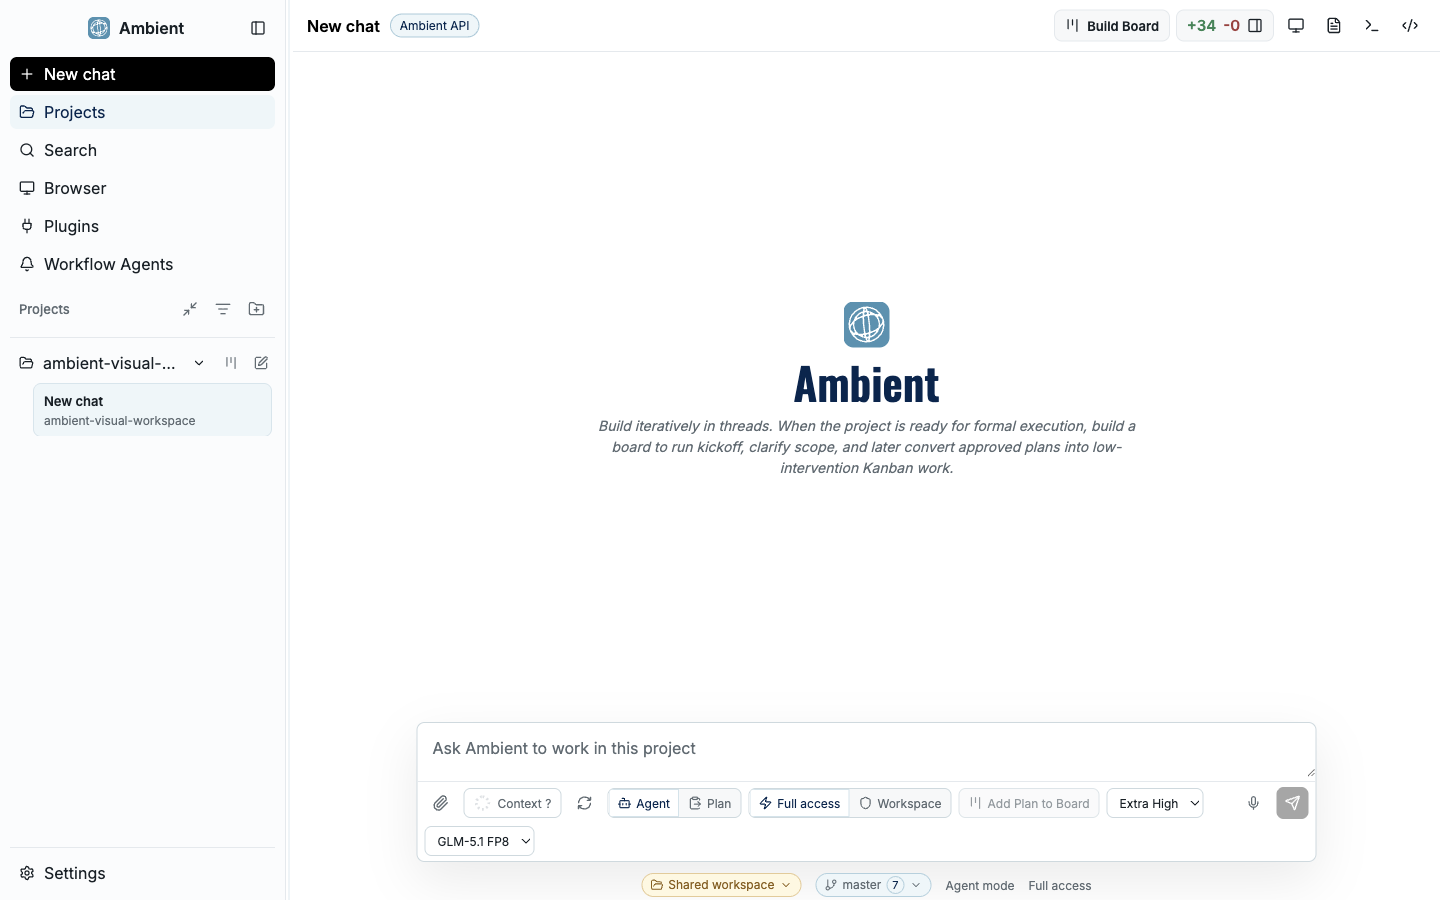
The main Ambient Desktop shell combines chat, workspace context, navigation, and evidence panels in one local developer workstation.
Welcome Folder Quickstart diagram. The Welcome Folder is a pinned project that starts at Instructions, then runs five ordered stages: Instructions (shell, icons, planner, board), Core Setup (guided setup and Settings), Plugin Setup (plugins and capabilities), Capability Readiness (ToolHive, Scrapling, providers), and First Useful Task (calculator in three modes). The quickstart flow is: follow UI, run task, inspect proof.
Start in the Welcome Folder#
On first launch, Ambient creates a pinned project named Welcome Folder. Open it from the sidebar before starting a real task. The folder is the product-owned first-run curriculum, not a sample project.
The Welcome Folder opens at the Instructions thread and includes two setup threads: Core Setup and Plugin Setup. It also copies product screenshots into the folder so the tour can show the actual shell, Planner Mode, Project Board, Draft Inbox, map view, Git summary, Plugin Manager, and Settings surfaces.
Open the pinned Welcome Folder#
Use the folder/project area in the sidebar and select Welcome Folder. If it is already open, stay there for the first session so the screenshots and seeded instructions match the workspace you are using.
Read the Instructions thread#
Use it as the live map of the shell: sidebar, composer, Planner Mode toggle, right-side work surfaces, Project Board, Git summary, browser, files, terminal, diffs, and Workflow Recordings.
Keep the Welcome screenshots nearby#
The screenshots in the Welcome Folder are the first visual references for this quickstart. They should match the product UI more closely than abstract diagrams.
Finish Core Setup before relying on web research#
Open the Core Setup thread. The live setup card is generated from Ambient's provider catalog and Settings actions, so the buttons you see there are the same product entry points used elsewhere in the app.
Click Start guided setup for the broad first-run path, or use Open Settings when you want to inspect a specific provider, permission, or runtime state. Setup chats are approval-gated: they should not silently install dependencies, bind secrets, download models, activate providers, or change provider selections.
Search, web, and research#
Review search providers, scraping, retrieval, and deep research setup. For most developers, the important early check is whether public web extraction can work safely.
MCP runtime and ToolHive#
Ambient uses ToolHive as the runtime boundary for MCP workloads. If Docker, Podman, or another supported container runtime is missing or not running, Core Setup should route you through recovery before installing default web capabilities.
Default Scrapling capability#
Scrapling is Ambient's reviewed default public web extraction capability. It is installed through a pinned descriptor and ToolHive-managed workload, and individual tool calls still remain permissioned.
Security and access#
Provider keys, browser credentials, permission grants, and account integrations stay in Ambient-managed approval surfaces. Do not paste secrets into chat.
Optional: local research setup#
Local Research and Local Deep Research should be presented as an expandable path, not as a prerequisite for every first run. Enable it when you want local-first retrieval, managed local model assets, or lower-latency research loops on a machine that can support the runtime.
When should I expand local research setup? Open it when your task benefits from local-first research, local model routing, or privacy-sensitive retrieval. Leave it collapsed for a normal first calculator task.
What does local research setup check? It should walk through runtime readiness, managed model assets, llama.cpp availability, provider preference, memory telemetry, validation, and repair steps.
How does this relate to ToolHive and Scrapling? ToolHive and Scrapling make public web extraction safer. Local Research is a separate optional path for local-first research and model-backed retrieval.
Open Plugin Setup after Core Setup#
Plugin Setup is for extension surfaces that are not already covered by Core Setup: curated or imported Codex plugins, Pi packages, custom MCP servers, generated capabilities, and workspace-specific integrations.
Use Open Plugins to inspect installed and importable capabilities. Use Create capability only when the existing catalog does not cover a narrow repeatable job. Generated capabilities should show their command contracts, dependency approvals, secret requests, validation, repair, update, re-registration, and removal actions.
| Surface | What it covers |
|---|---|
| Codex plugins | Curated or imported bundles with skills, apps, and MCP servers |
| Generated capabilities | Capability Builder packages that can be previewed, validated, repaired, updated, re-registered, and removed |
| Custom MCP | Custom MCP servers that are not the default Scrapling web research path |
| Team integrations | Plugins or generated capabilities for narrow internal tools with explicit inputs, outputs, secrets, and validation |
Connect Google Workspace (optional)#
If you want Ambient to work with Gmail, Google Calendar, and Drive, connect a Google account from Plugins → Install Capabilities → Google Workspace. It is a one-time, five-step setup, and each step shows its own status so you always know what is left. You will need a Google account and a free Google Cloud project to create the OAuth client.
This is a first-party connector, not a generic plugin: Ambient installs a pinned Google Workspace CLI, you supply your own Desktop OAuth client, and the connection is validated with read-only probes before anything depends on it. The five steps end in a read-only validation of Gmail, Calendar, and Drive.
Each step turns green as it completes. Validate runs read-only probes for Gmail, Calendar, and Drive.
Google Workspace Setup diagram. A five-step flow inside Plugins, Install Capabilities, first-party connector: 1 Install the Workspace CLI (Install gws), 2 Create a Desktop OAuth client (Open Google Console), 3 Import the OAuth client JSON (Import OAuth JSON), 4 Connect your Google account (Connect account), 5 Validate connectors (Validate). Each step turns green as it completes; Validate runs read-only probes for Gmail, Calendar, and Drive.
Install the Workspace CLI#
Click Install gws. Ambient downloads a pinned, checksum-verified Google Workspace CLI into its managed app data. There is no system-wide install to manage.
Create a Desktop OAuth client#
Click Open Google Console and create a Desktop application OAuth client in your own Google Cloud project: configure the consent screen, then download the client_secret JSON. The project, scopes, and consent stay yours.
Import the OAuth client JSON#
Click Import OAuth JSON and choose the downloaded client_secret file. Ambient copies it into local, tightly-permissioned storage. You never paste credentials into chat.
Connect your Google account#
Click Connect account to start a browser sign-in. You complete Google's login and consent yourself; Ambient never sees your password or 2FA code. The requested scopes cover Gmail, Calendar, and Drive.
Validate connectors#
Click Validate. Ambient runs quick read-only probes (list Gmail labels, list calendars, search Drive) and marks the account available once they pass.
What you can do once Google is connected#
| Connector | What it does |
|---|---|
| Gmail | Search and read mail, list labels, and draft messages. Inside Workflows, Google access stays read-only by default |
| Calendar | List calendars and search or read events. Event creation is gated and runs as a dry run by default inside Workflows |
| Drive | Search files, read and export documents, and materialize files into your workspace through approved file handles |
| Multiple accounts | Connect more than one account; when several are present, the agent asks which account a given request should use |
Why create my own OAuth client instead of signing in directly? Connecting through your own Google Cloud project means the access, scopes, and consent belong to you, and a Desktop OAuth client keeps the credential local to your machine.
Google shows an "unverified app" warning. Is that normal? Yes. While your OAuth client is in testing, Google shows an unverified-app notice and you must be listed as a test user on the consent screen. That is expected for a personal Desktop client.
Validation failed. What should I check? Re-run Validate. The usual causes are a missing test-user entry, an API not enabled in your Cloud project, or a rotated client secret (download and re-import the new JSON). Each probe reports which connector failed.
Run a calculator task three ways#
Use one contained task to learn the product: build a small calculator app with keyboard input, error states, and screenshot proof. Run it in a new folder so it is safe to inspect, delete, or repeat. The same task teaches three workflows (direct prompting, Planner-to-goal, and Planner-to-board):
| Path | Where you start | What you get |
|---|---|---|
| 1. Prompt it | The composer, in a new folder | Changed files, screenshot proof, and Git status |
| 2. Plan to goal | Planner Mode | A durable plan you review and approve before implementation |
| 3. Plan to Project Board | Planner Mode, then a board | Draft Inbox cards you accept individually, with per-card proof |
All paths end with changed files, screenshot proof, Git status, and next-step guidance.
Calculator Task Paths diagram. One contained Build a calculator task (keyboard input, errors, screenshot proof) teaches three workflows: Prompt it (single request, inspect result, Git summary), Plan to goal (Planner Mode, answer decisions, implement plan), and Plan to board (Draft Inbox, run cards, review proof). All paths end with changed files, screenshot proof, Git status, and next-step guidance.
Path 1: prompt it#
Create a new folder and ask:
Build a small calculator app with keyboard input, clear error states, and screenshot proof. Keep the implementation simple and show me the changed files and Git status when done.Path 2: plan to goal#
Switch to Planner Mode first. Ask for the same calculator, answer the required decisions, review the durable plan, then approve implementation from the plan.
Path 3: plan to Project Board#
Start in Planner Mode, create a board from the plan, review Draft Inbox cards, accept only the useful cards, run one card, then inspect proof before running the rest.
What to inspect before you trust the result#
- Changed files: inspect the files or diff panel rather than trusting the final message alone.
- Screenshot proof: confirm the calculator actually rendered and the UI state is visible.
- Terminal or validation output: check whether commands ran, failed, or were skipped.
- Project Board evidence: if you used the board path, inspect Draft Inbox choices, card proof, and map relationships.
- Git summary: confirm branch, worktree status, changed files, and whether a commit is appropriate.
Quickstart FAQ#
Do I need ToolHive before every task? No. A local calculator task can run without ToolHive. You need ToolHive readiness when using ToolHive-backed MCP workloads such as the default Scrapling public web extraction capability.
What if Core Setup says the container runtime is missing? Install or start Docker Desktop, Podman, or another supported runtime, then rerun the ToolHive readiness check before installing Scrapling.
Should I start with Project Board? Use direct prompting for a tiny task. Use Planner Mode when you want decisions recorded. Use Project Board when you want Draft Inbox review, card-level execution, dependencies, and durable proof.
Keep going#
- Project Board: turns goals into durable plans, task cards, source-backed evidence, and review loops
- Durable goals: plan, evidence, and continuation state persisted to disk, so work keeps its shape across turns, pauses, and restarts
- Provider routing: prioritize and fall back through providers for search, fetch, browser, media, and model-adjacent work